


Fiat Uno Manual
Pistons/connecting rods - removal and refitting (903 cc engine)Engine / Pistons/connecting rods - removal and refitting (903 cc engine)
1 Remove the cylinder head as described in Section 7.
2 Remove the sump pan as described in Section 8.
3 Undo and remove the big-end cap retaining bolts and keep them in their respective order for correct refitting.
4 Check that the connecting rod and big-end bearing cap assemblies are correctly marked.
Normally the numbers 1-4 are stamped on adjacent sides of the big-end caps and connecting rods, indicating which cap fits on which rod and which way round the cap fits.
The numbers are located on the sides of the rod and cap furthest away from the camshaft.
5 If numbers are not evident, then use a sharp file to make mating marks across the rod/cap joint. One line for connecting rod No. 1, two for connecting rod No. 2 and so on. This will ensure that there is no confusion later as it is most important that the caps go back in the correct position on the connecting rods from which they were removed. No. 1 piston should be at the crankshaft pulley end of the engine.
6 If the big-end caps are difficult to remove they may be gently tapped with a soft-faced hammer.
7 To remove the shell bearings, press the bearing opposite the groove in both the connecting rod and the connecting rod caps and the bearings will slide out easily.
8 Keep the shells with their original cap or rod if the bearings are not being renewed.
9 Withdraw the pistons and connecting rods upwards and ensure that they are kept in the correct order for replacement in the same bore.
10 If the cylinder has a wear ridge at its upper end then this may make it difficult to remove the piston. In this event, relieve the sharp edge of the ridge by scraping.
11 Dismantling the pistons is described in Section 18, paragraph 17.
12 Lay the piston and connecting rod assemblies in the correct order ready for refitting into their respective bores.
13 With a wad of clean non-fluffy rag wipe the cylinder bores clean.
14 Position the piston rings so that their gaps are 120º apart and then lubricate the rings.
15 Wipe clean the connecting rod half of the big-end bearing and the underside of the shell bearing. Fit the shell bearing in position with its locating tongue engaged with the corresponding groove in the connecting rod.
16 Fit a piston ring compressor to the top of the piston, making sure it is tight enough to compress the piston rings.
17 Using a piece of fine wire double check that the little jet hole in the connecting rod is clean.
18 The pistons, complete with connecting rods, are fitted to their bores from above. The number stamped on the connecting rod must face away from the camshaft with the arrow on the piston crown pointing towards the timing cover.
19 With the base of the piston ring compressor resting on the cylinder block, apply the wooden handle of a hammer to the piston crown, strike the hammer head with the hand and drive the piston/rod into its bore (photo).
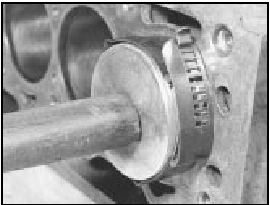
9.19 Fitting a piston/connecting rod
20 Draw the rod, complete with shell bearing down onto its crankpin.
21 Generously lubricate the crankpin journals with engine oil, and turn the crankshaft so that the crankpin is in the most advantageous position for the connecting rod to be drawn into it.
22 Wipe clean the connecting rod bearing cap and back of the shell bearing and fit the shell bearing in position ensuring that the locating tongue at the back of the bearing engages with the locating groove in the connecting rod cap.
23 Generously lubricate the shell bearing and offer up the connecting rod bearing cap to the connecting rod (photo).
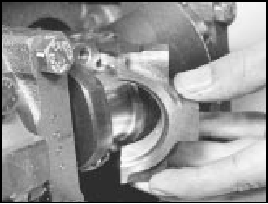
9.23 Big-end cap
24 Screw in the big-end bolts and tighten to the specified torque (photo).
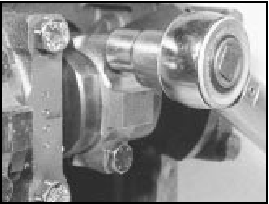
9.24 Tightening a big-end bolt
25 Refit the sump pan (Sec 8) and the cylinder head (Sec 7).
26 Refill the engine with oil and coolant.
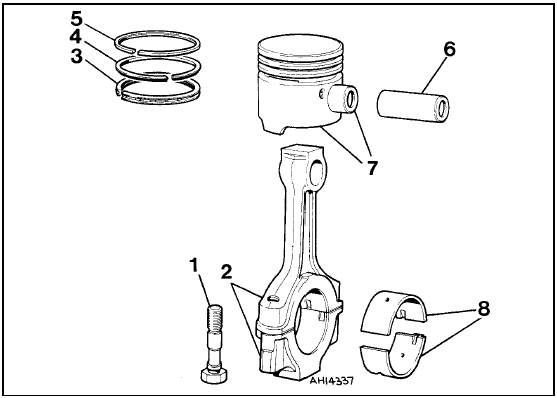
Fig. 1.8 Piston/connecting rod components (Sec 9)
1 Bolt
2 Connecting rod
3 Oil control ring
4 Compression ring (stepped at base)
5 Compression ring (marked TOP)
6 Gudgeon pin
7 Piston gudgeon pins
8 Big-end shell bearings


