


Fiat Uno Manual
Pistons/connecting rod - removal and refitting (1116 cc and 1301 cc engines)Engine / Pistons/connecting rod - removal and refitting (1116 cc and 1301 cc engines)
1 Remove the sump pan and the oil pump as described in Sections 30 and 31.
2 The big-end bearing shells can be renewed without having to remove the cylinder head if the caps are unbolted and the piston/connecting rod pushed gently about one inch up the bore (the crankpin being at its lowest point). If these shells are worn, however, the main bearing shells will almost certainly be worn as well. In this case, the engine should be removed for complete overhaul including crankshaft removal.
3 To remove the piston/connecting rods, remove the cylinder head as described in Section 29.
4 Grip the oil pick-up pipe and twist or rock it from its hole in the crankcase. It is an interference fit in the hole.
5 Unscrew the nuts from the big-end caps, then remove the caps with their bearing shells. The caps and their connecting rods are numbered 1, 2, 3 and 4 from the timing cover end of the engine. The numbers are adjacent at the big-end cap joint and on the side of the crankcase furthest from the auxiliary shaft.
6 If the bearing shells are to be used again, tape them to their respective big-end caps.
7 Push each connecting rod/piston assembly up the bore and out of the cylinder block.
There is one reservation; if a wear ridge has developed at the top of the bores, remove this by careful scraping before trying to remove the piston/rod assemblies. The ridge will otherwise prevent removal or break the piston rings during the attempt.
8 If the connecting rod bearing shells are to be used again, tape the shells to their respective rods.
9 Dismantling the piston/connecting rod is described in Section 18.
Refitting
10 Fit the new shells into the connecting rod
and caps, ensuring the surfaces on which the
shells seat, are clean and dry.
11 Check that the piston ring gaps are evenly spaced at 120º intervals. Liberally oil the rings and the cylinder bores.
12 Fit a piston ring clamp to compress the rings.
13 Insert the piston/connecting rod into the cylinder bore, checking that the rod assembly is correct for that particular bore. The cap and rod matching numbers must be furthest away from the auxiliary shaft (Fig. 1.31).
14 Push the piston into the bore until the piston ring clamp is against the cylinder block and then tap the crown of the piston lightly to push it out of the ring clamp and into the bore (photo).
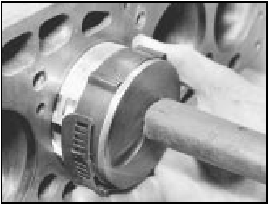
32.14 Fitting piston into cylinder bore
15 Oil the crankshaft journal and fit the big-end of the connecting rod to the journal.
Fit the big-end cap and nuts, checking that the cap is the right way round (photo).
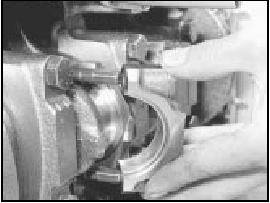
32.15 Fitting a big-end cap
16 Tighten the big-end nuts to the specified torque. The correct torque is important as the nuts have no locking arrangement. After tightening each big-end, check the crankshaft rotates smoothly (photo).

32.16 Tightening a big-end cap nut
17 Refit the oil pick-up pipe, the cylinder head, oil pump and sump pan, all as described earlier.
18 Refill the engine with oil and coolant.
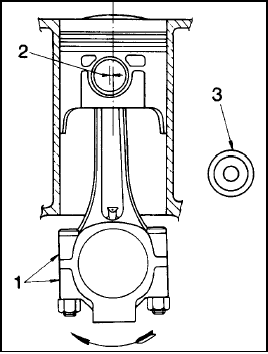
Fig. 1.31 Piston/connecting rod assembly diagram (Sec 32)
1 Matching numbers
2 Gudgeon pin offset
3 Auxiliary shaft
Arrow indicates direction of rotation of crankshaft viewed from timing belt end


